Swiping views using Android Tab Layout with swipe-able Fragments is the easiest and fastest way to switch views. Many famous apps like WhatsApp use Tab Layout to switch between calls, messages, and statuses. Android Material Design library provides a Tab Layout widget. In this tutorial, we will learn to develop material design swipe-able tabs using Tab Layout and View Pager.
Let’s get started with development. Here are the steps you need to follow to develop a swipeable tabs app.
1. Create New Android Studio Project
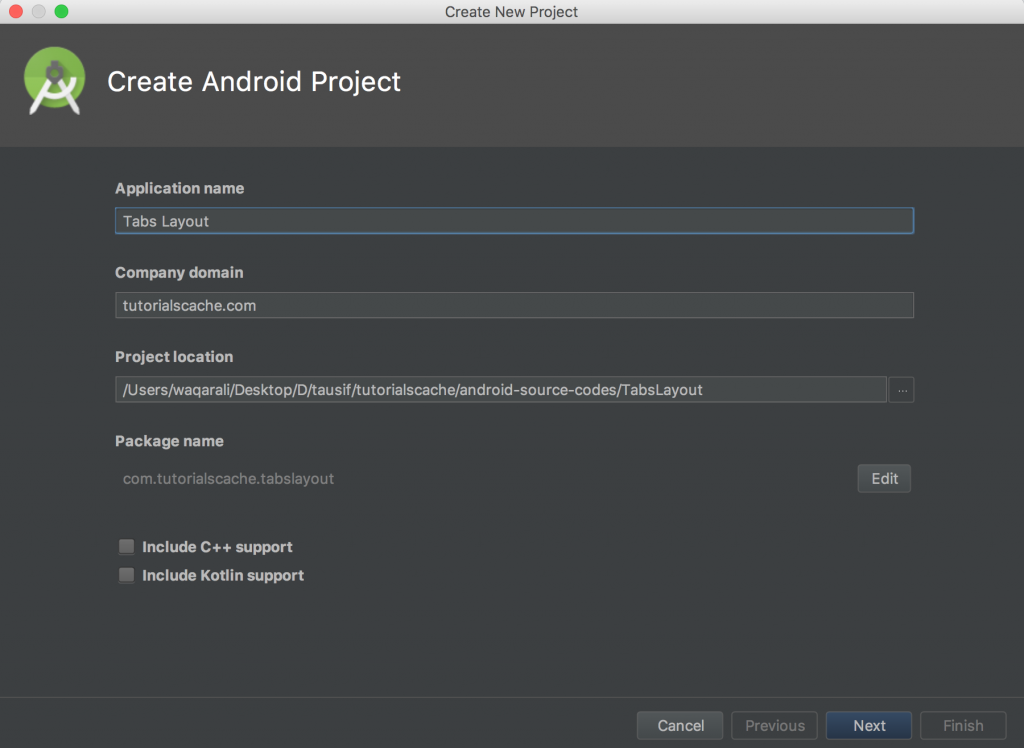
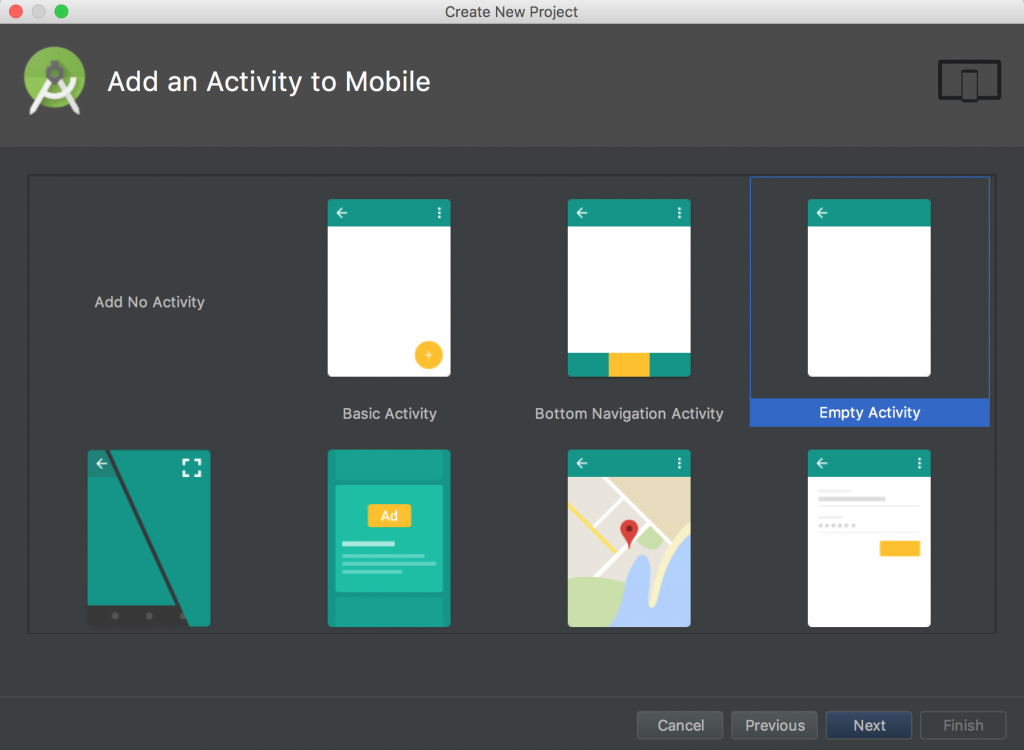
First of all, we will create a fresh new android studio project with an empty activity.
2. build.gradle (Module: app) support design Library.
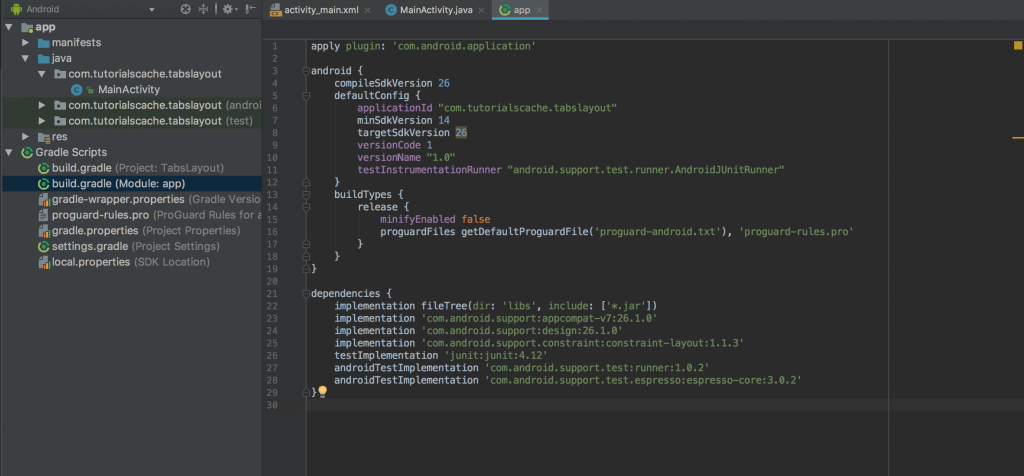
We need to add an android support design library for tab layout widgets. You need to open build.gradle module app and add the following code depending on your target SDK version.
implementation 'com.android.support:design:26.1.0'
3. Styles.xml
We need to replace DarkActionBar theme with NoActionBar because we are going to use Toolbar and TabLayout to show Tabs.
<resources>
    <!-- Base application theme. -->
    <style name="AppTheme" parent="Theme.AppCompat.Light.NoActionBar">
        <!-- Customize your theme here. -->
        <item name="colorPrimary">@color/colorPrimary</item>
        <item name="colorPrimaryDark">@color/colorPrimaryDark</item>
        <item name="colorAccent">@color/colorAccent</item>
    </style>
</resources>
3.1 colors.xml
<?xml version="1.0" encoding="utf-8"?>
<resources>
    <color name="colorPrimary">#d11617</color>
    <color name="colorPrimaryDark">#B31718</color>
    <color name="colorAccent">#B31718</color>
    <color name="white">#FFFFFF</color>
    <color name="grey">#d4d4d4</color>
</resources>
4. activity_main.xml
We will add Toolbar, Tablayout, and ViewPager inside our activity_main.xml file to display tabs. We will ink our TabLayout with ViewPage in ActivityMain.java implementation.
<?xml version="1.0" encoding="utf-8"?>
<RelativeLayout
    xmlns:android="http://schemas.android.com/apk/res/android"
    xmlns:app="http://schemas.android.com/apk/res-auto"
    xmlns:tools="http://schemas.android.com/tools"
    android:layout_width="match_parent"
    android:layout_height="match_parent"
    tools:context="com.tutorialscache.tabslayout.MainActivity">
    <android.support.design.widget.AppBarLayout
        android:id="@+id/appbarLayout"
        android:layout_height="wrap_content"
        android:layout_width="match_parent">
        <android.support.v7.widget.Toolbar
            android:id="@+id/toolBar"
            android:layout_width="match_parent"
            android:layout_height="wrap_content"
            android:background="@color/colorPrimary"
            android:minHeight="?attr/actionBarSize"
            android:theme="@style/Base.ThemeOverlay.AppCompat.Dark.ActionBar"
            app:popupTheme="@style/Base.Theme.AppCompat"/>
        <android.support.design.widget.TabLayout
            android:id="@+id/mTabLayout"
            android:labelFor="@id/toolBar"
            app:tabTextColor="@color/grey"
            app:tabIndicatorColor="@color/white"
            app:tabSelectedTextColor="@color/white"
            android:layout_width="match_parent"
            android:layout_height="wrap_content" />
    </android.support.design.widget.AppBarLayout>
    <android.support.v4.view.ViewPager
        android:layout_below="@id/appbarLayout"
        android:id="@+id/viewPager"
        android:layout_width="match_parent"
        android:layout_height="match_parent">
    </android.support.v4.view.ViewPager>
</RelativeLayout>
5. Fragments Creation
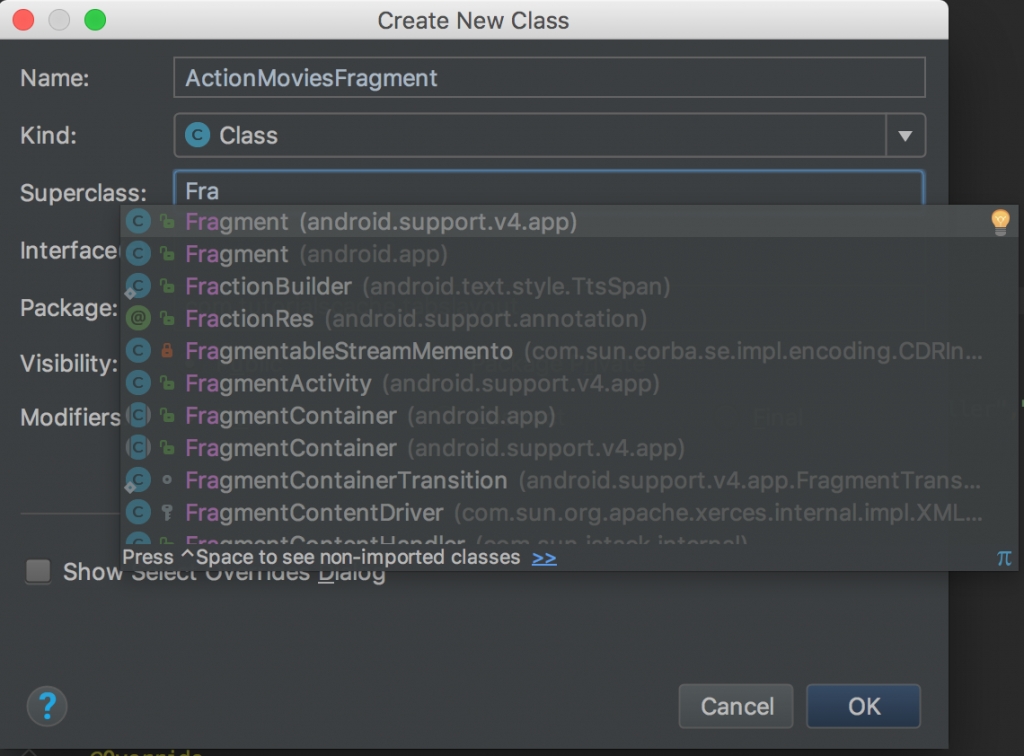
Now we will create a few fragments which will be shown through viewpager and TabLayout on MainActivity.java. To create a new fragment right click on your package and click new class. Fragment will be of movie types like action, drama, and comedy.
1. ActionMoviesFragment
After creating the ActionMoviesFragment class and extending it with the Fragment superclass we need to implement the onCreate and onCreateView methods. To return the view in onCreateView we need also to create a new XML file and name it fragment_action.xml.
We will implement ArrayAdapter in fragments to show movie names on ListView. If you want to learn how ArrayAdapter works please visit Simple ListView using ArrayAdapter – Android Example.
After implementation, our codes will look like this in ActionMoviesFragment.java
package com.tutorialscache.tabslayout;
import android.os.Bundle;
import android.support.annotation.Nullable;
import android.support.v4.app.Fragment;
import android.view.LayoutInflater;
import android.view.View;
import android.view.ViewGroup;
import android.widget.ArrayAdapter;
import android.widget.ListView;
public class ActionMoviesFragment extends Fragment {
    ListView listView;
    ArrayAdapter<String> arrayAdapter;
    String[] actionMovies = {"Final Score","Venom","Overlord","Hunter Killer","Beirut","Tomb Raider","Den of Thieves","Upgrade",
            "Aquaman","Mohawk","Braven","Mandy","Black Panther","The Commuter","Revenge"};
    public ActionMoviesFragment(){
    //constructor
    }
    @Override
    public void onCreate(@Nullable Bundle savedInstanceState) {
        super.onCreate(savedInstanceState);
    }
    @Nullable
    @Override
    public View onCreateView(LayoutInflater inflater, @Nullable ViewGroup container, @Nullable Bundle savedInstanceState) {
        return inflater.inflate(R.layout.fragment_action,container,false);
    }
    @Override
    public void onViewCreated(View view, @Nullable Bundle savedInstanceState) {
        super.onViewCreated(view, savedInstanceState);
        listView = view.findViewById(R.id.listView);
        arrayAdapter = new ArrayAdapter<>(getActivity(),android.R.layout.simple_list_item_1,actionMovies);
        //setting ArrayAdapter on listView
        listView.setAdapter(arrayAdapter);
    }
}
fragment_action.xml
<?xml version="1.0" encoding="utf-8"?>
<LinearLayout
    xmlns:android="http://schemas.android.com/apk/res/android"
    android:layout_width="match_parent"
    android:layout_height="match_parent"
    android:orientation="vertical">

    <ListView
        android:id="@+id/listView"
        android:layout_width="match_parent"
        android:layout_height="wrap_content">
    </ListView>

</LinearLayout>
2. DramaMoviesFragment.java
By following the previous fragment steps we will create another fragment name DramaMoviesFragment.java and a few movies with drama categories.
After implementation code will look like this in DramaMoviesFragment.java
package com.tutorialscache.tabslayout;
import android.os.Bundle;
import android.support.annotation.Nullable;
import android.support.v4.app.Fragment;
import android.view.LayoutInflater;
import android.view.View;
import android.view.ViewGroup;
import android.widget.ArrayAdapter;
import android.widget.ListView;
public class DramaMoviesFragment extends Fragment {
    ListView listView;
    ArrayAdapter<String> arrayAdapter;
    String[] dramaMovies = {"First Man","Vice","Tully","The commuter","Creed II","Searching"};
    public DramaMoviesFragment(){
        //constructor
    }
    @Override
    public void onCreate(@Nullable Bundle savedInstanceState) {
        super.onCreate(savedInstanceState);
    }
    @Nullable
    @Override
    public View onCreateView(LayoutInflater inflater, @Nullable ViewGroup container, @Nullable Bundle savedInstanceState) {
        return inflater.inflate(R.layout.fragment_drama,container,false);
    }
    @Override
    public void onViewCreated(View view, @Nullable Bundle savedInstanceState) {
        super.onViewCreated(view, savedInstanceState);
        listView = view.findViewById(R.id.listView);
        arrayAdapter = new ArrayAdapter<>(getActivity(),android.R.layout.simple_list_item_1,dramaMovies);
        //setting ArrayAdapter on listView
        listView.setAdapter(arrayAdapter);
    }
}
fragment_drama.xml
<?xml version="1.0" encoding="utf-8"?>
<LinearLayout
    xmlns:android="http://schemas.android.com/apk/res/android" android:layout_width="match_parent"
    android:layout_height="match_parent">

    <ListView
        android:id="@+id/listView"
        android:layout_width="match_parent"
        android:layout_height="wrap_content">
    </ListView>

</LinearLayout>
3. ComedyMoviesFragment
Third and the last fragment will be ComedyMoviesFragment in which we will list Comedy movies. Create a new fragment and name it as ComedyMoviesFragment which will look like this.
package com.tutorialscache.tabslayout;
import android.os.Bundle;
import android.support.annotation.Nullable;
import android.support.v4.app.Fragment;
import android.view.LayoutInflater;
import android.view.View;
import android.view.ViewGroup;
import android.widget.ArrayAdapter;
import android.widget.ListView;
public class ComedyMoviesFragment extends Fragment {
    ListView listView;
    ArrayAdapter<String> arrayAdapter;
    String[] comedyMovies = {"TAG","The Grinch","Damsel","Early Man","'Blockers","Overboard"};
    public ComedyMoviesFragment(){
        //constructor
    }
    @Override
    public void onCreate(@Nullable Bundle savedInstanceState) {
        super.onCreate(savedInstanceState);
    }
    @Nullable
    @Override
    public View onCreateView(LayoutInflater inflater, @Nullable ViewGroup container, @Nullable Bundle savedInstanceState) {
        return inflater.inflate(R.layout.fragment_comedy,container,false);
    }
    @Override
    public void onViewCreated(View view, @Nullable Bundle savedInstanceState) {
        super.onViewCreated(view, savedInstanceState);
        listView = view.findViewById(R.id.listView);
        arrayAdapter = new ArrayAdapter<>(getActivity(),android.R.layout.simple_list_item_1,comedyMovies);
        //setting ArrayAdapter on listView
        listView.setAdapter(arrayAdapter);
    }
}
fragment_comedy.xml
<?xml version="1.0" encoding="utf-8"?>
<android.support.constraint.ConstraintLayout
    xmlns:android="http://schemas.android.com/apk/res/android" android:layout_width="match_parent"
    android:layout_height="match_parent">
    <ListView
        android:id="@+id/listView"
        android:layout_width="match_parent"
        android:layout_height="wrap_content">
    </ListView>

</android.support.constraint.ConstraintLayout>
6. PagerAdapter
PagerAdapter will be used to set fragments on TabLayout. Create a new class PagerAdapter and extend it with FragmentPagerAdapter.
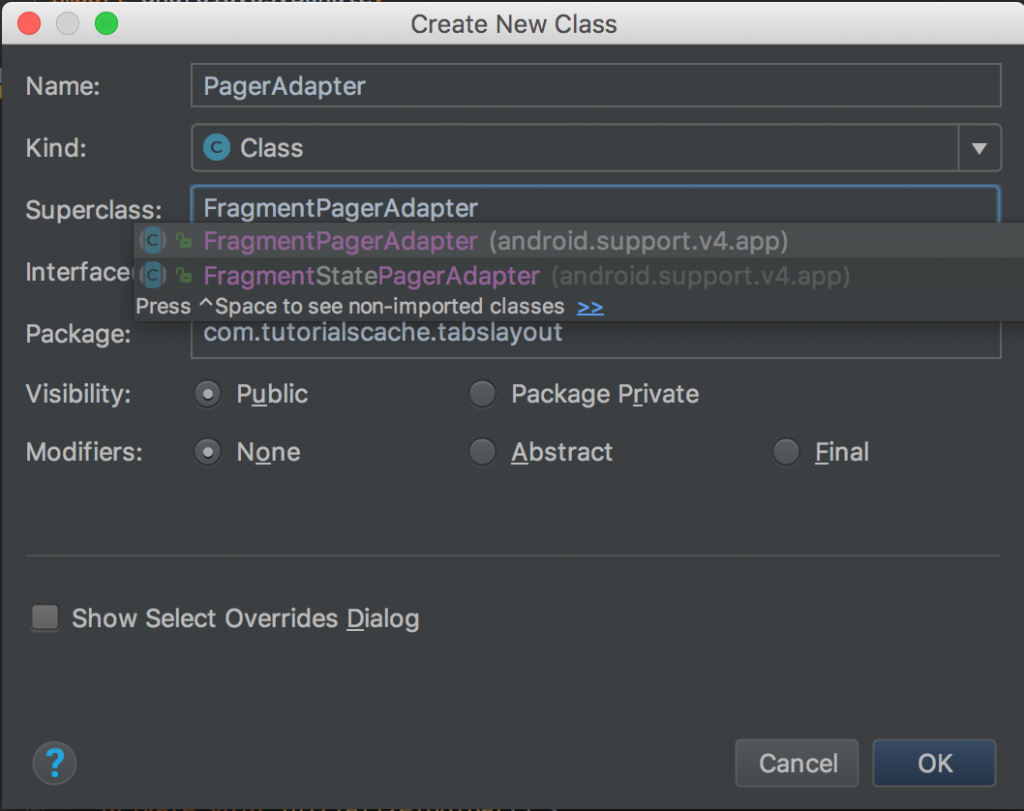
Implement the Adapter in the following way in PagerAdapter.java
package com.tutorialscache.tabslayout;
import android.support.v4.app.Fragment;
import android.support.v4.app.FragmentManager;
import android.support.v4.app.FragmentPagerAdapter;
import java.util.ArrayList;
public class PagerAdapter extends FragmentPagerAdapter {
    ArrayList<Fragment> fragmentsList = new ArrayList<>();
    ArrayList<String> fragmentsTitle = new ArrayList<>();
    public PagerAdapter(FragmentManager fm) {
        super(fm);
    }
    @Override
    public Fragment getItem(int position) {
        return fragmentsList.get(position);
    }
    @Override
    public int getCount() {
        return fragmentsList.size();
    }
    @Override
    public CharSequence getPageTitle(int position) {
        return fragmentsTitle.get(position);
    }
    public void addFragment(Fragment fragment, String title) {
        fragmentsList.add(fragment);
        fragmentsTitle.add(title);
    }
}
7. MainActivity.java
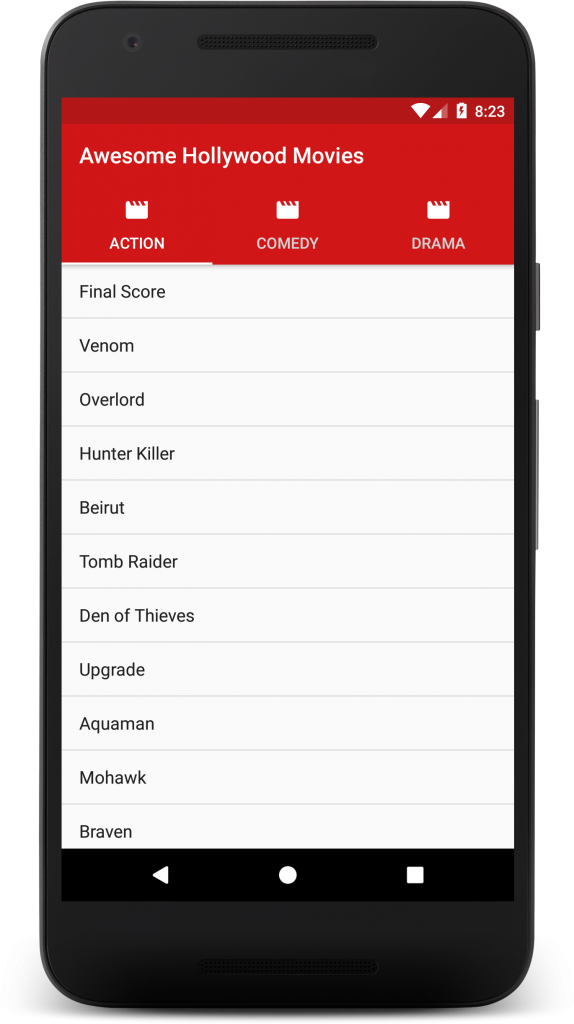
MainActivity is the core implementation of the whole project here I have used a naming convention that very meaning full so you can understand it easily. You can place icons in drawable and link to each tab using setIcon of TabLayout.
package com.tutorialscache.tabslayout;
import android.support.design.widget.TabLayout;
import android.support.v4.view.ViewPager;
import android.support.v7.app.AppCompatActivity;
import android.os.Bundle;
import android.support.v7.widget.Toolbar;
public class MainActivity extends AppCompatActivity {
    Toolbar toolbar;
    TabLayout tabLayout;
    ViewPager viewPager;
    PagerAdapter pagerAdapter;
    @Override
    protected void onCreate(Bundle savedInstanceState) {
        super.onCreate(savedInstanceState);
        setContentView(R.layout.activity_main);
        //link views
        getViews();
        //setting toolbar
        initializeToolBar();
        //adapter setup
        pagerAdapter = new PagerAdapter(getSupportFragmentManager());
        //attaching fragments to adapter
        pagerAdapter.addFragment(new ActionMoviesFragment(),"Action");
        pagerAdapter.addFragment(new ComedyMoviesFragment(),"Comedy");
        pagerAdapter.addFragment(new DramaMoviesFragment(),"Drama");
        viewPager.setAdapter(pagerAdapter);
        tabLayout.setupWithViewPager(viewPager);
        //setting icons
        tabLayout.getTabAt(0).setIcon(R.drawable.ic_movie_white_24dp);
        tabLayout.getTabAt(1).setIcon(R.drawable.ic_movie_white_24dp);
        tabLayout.getTabAt(2).setIcon(R.drawable.ic_movie_white_24dp);
    }
    private void getViews() {
        toolbar = findViewById(R.id.toolBar);
        tabLayout = findViewById(R.id.mTabLayout);
        viewPager = findViewById(R.id.viewPager);
    }
    private void initializeToolBar() {
        setSupportActionBar(toolbar);
        getSupportActionBar().setTitle("Awesome Hollywood Movies");
     }
}


Comments are closed.