In application development, Model View Presenter is one of the design patterns. In the MVP design pattern, Presenter manages all the communication between View and Model. Just as discussed earlier in the MVVM tutorial, where View Model acts as Presenter.
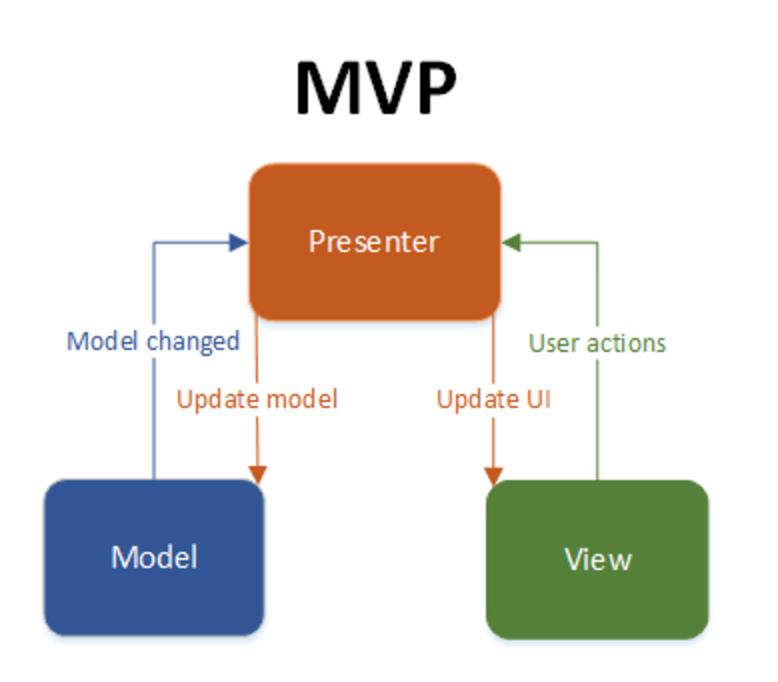
MVP Design pattern Components:
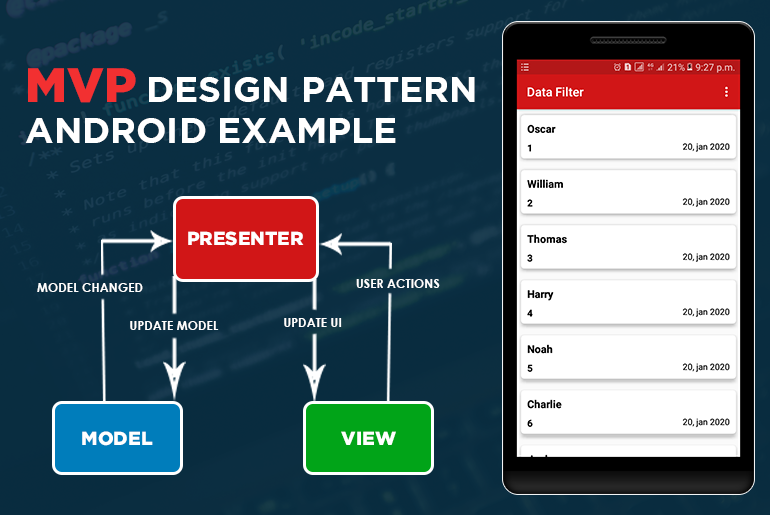
As shown in the MVP diagram, each component has a separation of concern from each other. For example, in MVP
- Model: The data that we show in the View is provided by Model. Moreover, it deals with database operations.
- View: It is only responsible for user interaction and has no concern for business logic.
- Presenter: It is the middle man between Model and View. So when a user interacts with View, the business logic we write in the Presenter is triggered. As a result, it performs changes to the Model and also shows these changes in View.
We will go step by step so you can understand and implement it easily. Moreover, this tutorial also has a complete source code at the end so you can download and use it.
1. Create a new Android project.
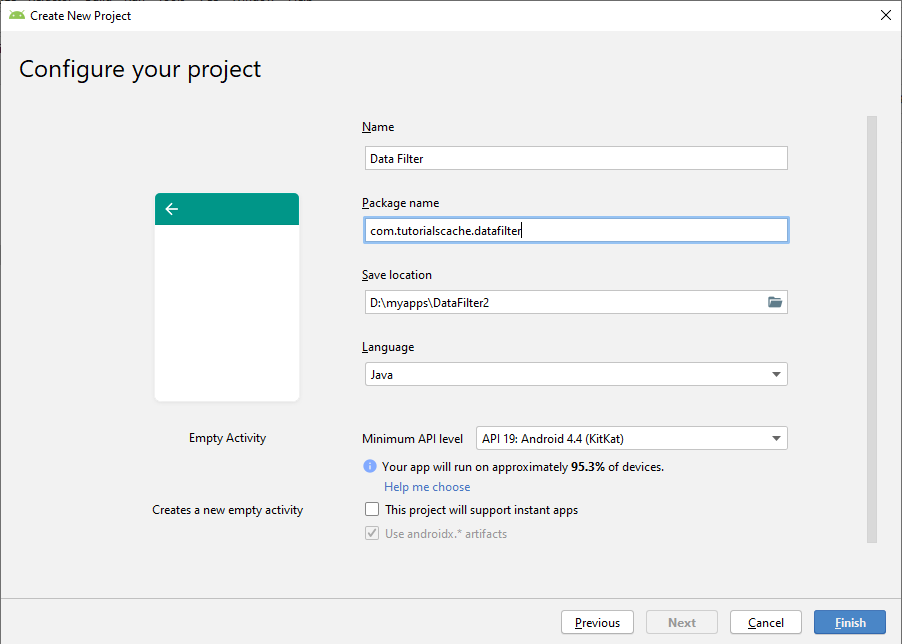
Firstly, create a new project with the name Data Filter. After that, we will also give the package name.
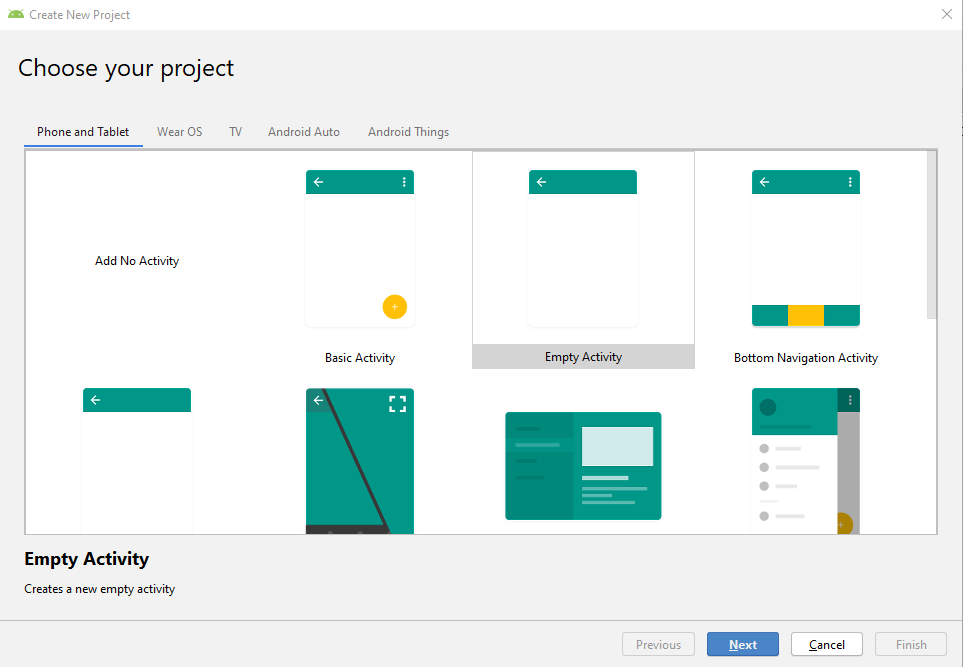
In this choose project window, there are so many different types of templates for activities. But for now, we will choose the empty activity.
colors.xml
After that, add these colors to your colors.xml file
<?xml version="1.0" encoding="utf-8"?>
<resources>
    <color name="colorPrimary">#d11617</color>
    <color name="colorPrimaryDark">#B31718</color>
    <color name="colorAccent">#D81B60</color>
    <color name="white">#ffffff</color>
</resources>
2. Create model Package.
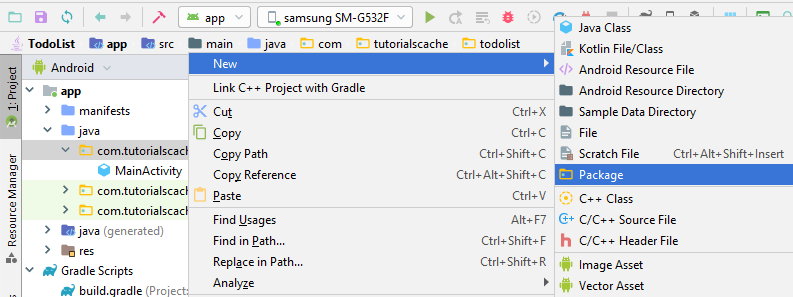
After that, right-click on your app package name and create a new package with the name model. This package contains all classes related to our application data.
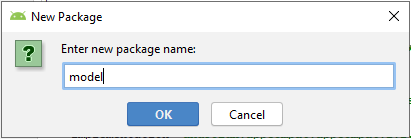
Create DataModel.java class.
Inside this model package, create a model class and name it as DataModel. In order to do that, right-click on the model package and create a new class.
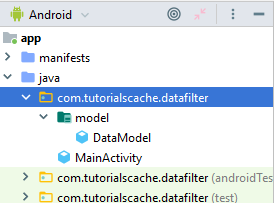
Moreover, this class will have the following items
- Getters and Setters for all the data fields.
- Constructor.
package com.tutorialscache.datafilter.model;
public class DataModel {
    private int id;
    private String name;
    private int rollNumber;
    public DataModel(int id, String name, int rollNumber) {
        this.id = id;
        this.name = name;
        this.rollNumber = rollNumber;
    }
    public int getId() {
        return id;
    }
    public void setId(int id) {
        this.id = id;
    }
    public String getName() {
        return name;
    }
    public void setName(String name) {
        this.name = name;
    }
    public int getRollNumber() {
        return rollNumber;
    }
    public void setRollNumber(int rollNumber) {
        this.rollNumber = rollNumber;
    }
    @Override
    public String toString() {
        return "DataModel{" +
                "id=" + id +
                ", name='" + name + '\'' +
                ", rollNumber=" + rollNumber +
                '}';
    }
}
3. Create presenter Package.
After completing the model section, right-click in the app package and create a new package and name it presenter.

Create MainActivityPresenter.java class.
Inside this presenter package, create a model class and name it as MainActivityPresenter. In order to do that, right-click on the presenter package and create a new class.
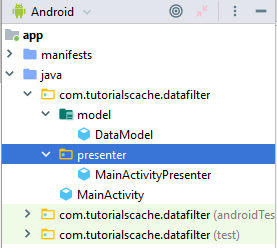
This class contains the following items.
- Constructor (id, name, roll number).
- initData() method to add data in an array list of the model class.
- addDatas() interface to show data of array list in the adapter.
- Methods to sort name and roll number in ascending and descending order.
package com.tutorialscache.datafilter.presenter;
import android.util.Log;
import com.tutorialscache.datafilter.model.DataModel;
import java.util.ArrayList;
import java.util.Collections;
import java.util.Comparator;
public class MainActivityPresenter {
    private View view;
    DataModel dataModel;
    ArrayList<DataModel> datas=new ArrayList<DataModel>();
    public MainActivityPresenter(View view ) {
       this.view = view;
    }
    public void initData() {
        // student 1
        dataModel = new DataModel(1, "Oliver",11);
        datas.add(dataModel);
        //student 2
        dataModel = new DataModel(2, "George", 12);
        datas.add(dataModel);
        //student 3
        dataModel = new DataModel(3, "Harry" , 4);
        datas.add(dataModel);
        //student 4
        dataModel = new DataModel(4,  "Jack" , 7);
        datas.add(dataModel);
        //student 5
        dataModel = new DataModel(5, "Jacob", 8);
        datas.add(dataModel);
        //student 6
        dataModel = new DataModel(6, "Noah", 5);
        datas.add(dataModel);
        //student 7
        dataModel = new DataModel(7, "Charlie", 6);
        datas.add(dataModel);
        //student 8
        dataModel = new DataModel(8, "Thomas", 3);
        datas.add(dataModel);
        //student 9
        dataModel = new DataModel(10,  "Oscar", 1);
        datas.add(dataModel);
        //student 10
        dataModel = new DataModel(11, "William", 2);
        datas.add(dataModel);
        //student 11
        dataModel = new DataModel(12,  "Henry", 9);
        datas.add(dataModel);
        //student 12
        dataModel = new DataModel(13, "Freddie", 10);
        datas.add(dataModel);
        Log.d("response", "initData: " + datas + "");
        //passing data to interface method addDatas
        view.addDatas(datas);
    }
    //interface of main activity presenter to add data in arraylist of data model
public interface View {
void addDatas(ArrayList<DataModel> datas);
}
//methods for sorting name in ascending order
public void sortNameASC()
{
Collections.sort(datas, new Comparator<DataModel>() {
@Override
public int compare(DataModel o1, DataModel o2) {
return o1.getName().compareTo(o2.getName());
}
});
Log.d("response", "sortNameASC: "+datas+"");
}
//methods for sorting name in dscending order
public void sortNameDSC()
{
Collections.sort(datas, new Comparator<DataModel>() {
@Override
public int compare(DataModel o1, DataModel o2) {
return o2.getName().compareTo(o1.getName());
}
});
Log.d("response", "sortNameDSC: "+datas+"");
}
//methods for sorting Roll number in ascending order
public void sortRollNoASC()
{
Collections.sort(datas, new Comparator<DataModel>() {
@Override
public int compare(DataModel o1, DataModel o2) {
return o1.getRollNumber()-o2.getRollNumber();
}
});
Log.d("response", "sortRollNoASC: "+datas+"");
}
//methods for sorting Roll number in dscending order
public void sortRollNoDSC()
{
Collections.sort(datas, new Comparator<DataModel>() {
@Override
public int compare(DataModel o1, DataModel o2) {
return o2.getRollNumber()-o1.getRollNumber();
}
});
Log.d("response", "sortRollNoDSC: "+datas+"");
}
}
4. Create view Package.
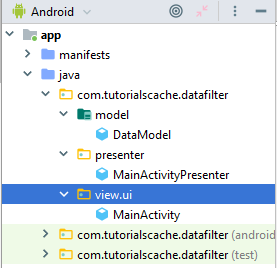
After completing the presenter section, right-click on the app package and create a new package and name it view.

Create MainActivity.java class.
Inside this view package, create a new package and name it as ui. Moreover, drag the MainActivity into the ui package.
activity_main.xml
In this layout file, add a recycler view.
<?xml version="1.0" encoding="utf-8"?>
<androidx.constraintlayout.widget.ConstraintLayout xmlns:android="http://schemas.android.com/apk/res/android"
    xmlns:tools="http://schemas.android.com/tools"
    android:layout_width="match_parent"
    android:layout_height="match_parent"
    tools:context=".view.ui.MainActivity">
    <androidx.recyclerview.widget.RecyclerView
        android:id="@+id/data_list"
        android:layout_width="match_parent"
        android:layout_height="match_parent" >
    </androidx.recyclerview.widget.RecyclerView>
</androidx.constraintlayout.widget.ConstraintLayout>
main_menu.xml
After that, right-click on resource directory and create a new menu file main_menu and the following code.
<?xml version="1.0" encoding="utf-8"?>
<menu xmlns:android="http://schemas.android.com/apk/res/android">
    <item
        android:id="@+id/sortNameASC"
        android:title="Sort by Name ASC" />
    <item
        android:id="@+id/sortNameDSC"
        android:title="Sort by Name DSC" />
    <item
        android:id="@+id/sortDateASC"
        android:title="Sort by Roll No ASC" />
    <item
        android:id="@+id/sortDateDSC"
        android:title="Sort by Roll No DSC" />
</menu>
data_list.xml
After that, create a new layout resource file and name it as data_list and use the following code.
<?xml version="1.0" encoding="utf-8"?>
<androidx.cardview.widget.CardView xmlns:android="http://schemas.android.com/apk/res/android"
    xmlns:card="http://schemas.android.com/apk/res-auto"
    android:layout_width="match_parent"
    android:layout_height="wrap_content"
    card:cardCornerRadius="5dp"
    card:cardElevation="5dp"
    card:cardUseCompatPadding="true">
    <RelativeLayout
        android:layout_width="wrap_content"
        android:layout_height="70dp"
        android:padding="10dp">
        <TextView
            android:id="@+id/tv_item_name"
            android:layout_width="wrap_content"
            android:layout_height="wrap_content"
            android:ellipsize="end"
            android:textSize="17sp"
            android:textStyle="bold"
            android:maxLines="1"
            android:textColor="@android:color/black" />
        <TextView
            android:id="@+id/tv_item_rollNo"
            android:layout_width="wrap_content"
            android:layout_height="wrap_content"
            android:layout_below="@id/tv_item_name"
            android:layout_marginTop="8dp"
            android:textStyle="bold"
            android:textSize="15sp"
            android:textColor="#000"
            android:ellipsize="end"
            android:maxLines="1" />
        <TextView
            android:layout_width="wrap_content"
            android:layout_height="wrap_content"
            android:text="20, jan 2020"
            android:textColor="#000"
            android:layout_alignParentEnd="true"
            android:layout_alignParentBottom="true">
        </TextView>
    </RelativeLayout>
</androidx.cardview.widget.CardView>
DataListAdapter.java
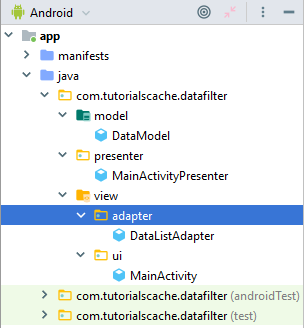
After that, create an adapter class and name it as DataListAdapter. This adapter class will be used to display a data list on our recycler view. Moreover, we will refactor our RecyclerView.Adapter to a ListAdapter. As a result, the list adapter will handle all operations.
Before creating this class, we need to create a new package name called adapter.
package com.tutorialscache.datafilter.view.adapter;
import android.view.LayoutInflater;
import android.view.View;
import android.view.ViewGroup;
import android.widget.TextView;
import com.tutorialscache.datafilter.R;
import com.tutorialscache.datafilter.model.DataModel;
import androidx.annotation.NonNull;
import androidx.recyclerview.widget.DiffUtil;
import androidx.recyclerview.widget.ListAdapter;
import androidx.recyclerview.widget.RecyclerView;
//we will refactor our RecyclerView.Adapter to a ListAdapter ,so now list adapter will handle all operation
public class DataListAdapter extends ListAdapter<DataModel,DataListAdapter.ViewHolder> {
    //Constructor
    public DataListAdapter() {
        super(DIFF_CALLBACK);
    }
    //to check weather to items have same id or not
    private static final DiffUtil.ItemCallback<DataModel> DIFF_CALLBACK = new
     DiffUtil.ItemCallback<DataModel>() {
        @Override
        public boolean areItemsTheSame(DataModel oldItem, DataModel newItem) {
            return oldItem.getId() == newItem.getId();
        }
        //to check weather to items have same contects or not
        @Override
        public boolean areContentsTheSame(DataModel oldItem, DataModel newItem) {
            return oldItem.getName().equals(newItem.getName()) &&
                    oldItem.getRollNumber()==newItem.getRollNumber();
        }
    };
    @NonNull
    @Override
    public ViewHolder onCreateViewHolder(@NonNull ViewGroup parent, int viewType) {
        View view = LayoutInflater.from(parent.getContext())
                .inflate(R.layout.data_list, parent, false);
        return new ViewHolder(view);
    }
    @Override
    public void onBindViewHolder(@NonNull ViewHolder holder, int position) {
        holder.name.setText(getItem(position).getName());
        holder.rollNo.setText(String.valueOf(getItem(position).getRollNumber()));
    }
    public class ViewHolder extends RecyclerView.ViewHolder {
        TextView name, rollNo;
        ViewHolder(View itemView) {
            super(itemView);
            name = itemView.findViewById(R.id.tv_item_name);
            rollNo = itemView.findViewById(R.id.tv_item_rollNo);
        }
    }
}
DataActivity.java Code.
In this class, we will create an instance of the presenter class to call its methods. Moreover, we will implement the interface of the presenter class to add the array list to the adapter.
package com.tutorialscache.datafilter.view.ui;
import androidx.annotation.NonNull;
import androidx.appcompat.app.AppCompatActivity;
import androidx.recyclerview.widget.LinearLayoutManager;
import androidx.recyclerview.widget.RecyclerView;
import android.os.Bundle;
import android.util.Log;
import android.view.Menu;
import android.view.MenuInflater;
import android.view.MenuItem;
import com.tutorialscache.datafilter.R;
import com.tutorialscache.datafilter.model.DataModel;
import com.tutorialscache.datafilter.presenter.MainActivityPresenter;
import com.tutorialscache.datafilter.view.adapter.DataListAdapter;
import java.util.ArrayList;
public class MainActivity extends AppCompatActivity implements MainActivityPresenter.View {
    RecyclerView recyclerView;
    MainActivityPresenter mainPresenter;
    DataListAdapter adapter;
    @Override
    protected void onCreate(Bundle savedInstanceState) {
        super.onCreate(savedInstanceState);
        setContentView(R.layout.activity_main);
       //configuring recycler view
        recyclerView = findViewById(R.id.data_list);
        recyclerView.setLayoutManager(new LinearLayoutManager(this));
        recyclerView.setHasFixedSize(true);
        //setting adapter to recycler view
        adapter = new DataListAdapter();
        recyclerView.setAdapter(adapter);
       //creating instance of presenter class
        mainPresenter = new MainActivityPresenter(this);

        //calling initData method of presenter class in which we added dtudent record
        mainPresenter.initData();
    }
   // interface method of mainActivityPresenter class
    @Override
    public void addDatas(ArrayList<DataModel> datas) {
        //adding array list in adapter
        adapter.submitList(datas);
        adapter.notifyDataSetChanged();
        Log.d("response","onCreate: "+datas+" ");
    }
    @Override
    public boolean onCreateOptionsMenu(Menu menu) {
        MenuInflater menuInflater = getMenuInflater();
        menuInflater.inflate(R.menu.main_menu, menu);
        return true;
    }
    @Override
    public boolean onOptionsItemSelected(@NonNull MenuItem item) {
        switch (item.getItemId())
        {
            case R.id.sortNameASC:
                //calling presenter class method for sorting name in ascending order.
                mainPresenter.sortNameASC();
                adapter.notifyDataSetChanged();
                break;
            case R.id.sortNameDSC:
                //calling presenter class method for sorting name in dscending order.
                mainPresenter.sortNameDSC();
                adapter.notifyDataSetChanged();
                break;
            case R.id.sortDateASC:
                //calling presenter class method for sorting roll no. in ascending order.
                mainPresenter.sortRollNoASC();
                adapter.notifyDataSetChanged();
                break;
            case R.id.sortDateDSC:
                //calling presenter class method for sorting roll no. in dscending order.
                mainPresenter.sortRollNoDSC();
                adapter.notifyDataSetChanged();
                break;
                default:
                    break;
        }
        return super.onOptionsItemSelected(item);
    }
}



Comments are closed.